

Git - For Fun and Profit
This article will help you get started with Git.
Git is an extremely powerful tool. An understanding of Git will help you collaborate with product development engineers and it will help you solve some of your product security challenges.
Unfortunately, many security engineers dismiss Git as a tool strictly for developers. They are missing a key point. Learning Git will improve your collaboration. It will give you a shared mental model.
Shared Mental Models Improve Collaboration
When we have shared mental models, we can more quickly communicate ideas and have a common understanding of problems and potential solutions. - Gene Kim, The Phoenix Project (2013)
Mastering Git leads to clearer communication and better teamwork between security and development teams. Here are three other reasons security engineers should learn Git:
Incident Response - Git's detailed history and logs can help during incident investigations.
Remediation - Git is your source of truth when verifying whether a vulnerability has been fixed.
Collaboration - Git can help with tasks where teamwork and version tracking are important. I've used it for meeting notes and weekly business review metrics.
You are in luck. Learning Git won't take a long time. In a few minutes, you can learn enough to start using Git.
Here’s how to get started:
Step 1: Learn How Git Works
Let's take a quick look at how Git works. It is easy to get into a tricky situation with Git. Knowing how it works will help you find your way out of a future mess.
Version Control System
Git is a version control system like CVS or Subversion. CVS and Subversion use delta-based version control. That is, they track changes, or deltas, to files.
Git uses a series of snapshots, and it operates more like a filesystem. Git records a SHA-1 checksum hash for every file or directory it tracks. This makes Git more efficient than previous version control systems.
There are three critical concepts to understand: file states, environments and the Git workflow. Let's dive into each one.
File States
This is important. Git tracks the state of each file. The possible states are:
Untracked - a new file that is not tracked by Git.
Modified - you have modified the file but have not committed it yet.
Staged - you have moved the file to staging. It is ready to be committed.
Committed - your change is safely stored in your local Git database.
Understanding file states helps you grasp a Git project's environments.
Git Project Environments
There are three environments in Git. Think of them as distinct workspaces for your files. They are:
Working - includes local copies of the files in the state they were in at the last commit.
Staging - a queue of changes that will go into your next commit.
Commit - Git has saved your file state and recorded a hash in your .git directory.
As you probably noticed, file states and environments are sequential. They fit into a typical Git workflow.
Git Workflow
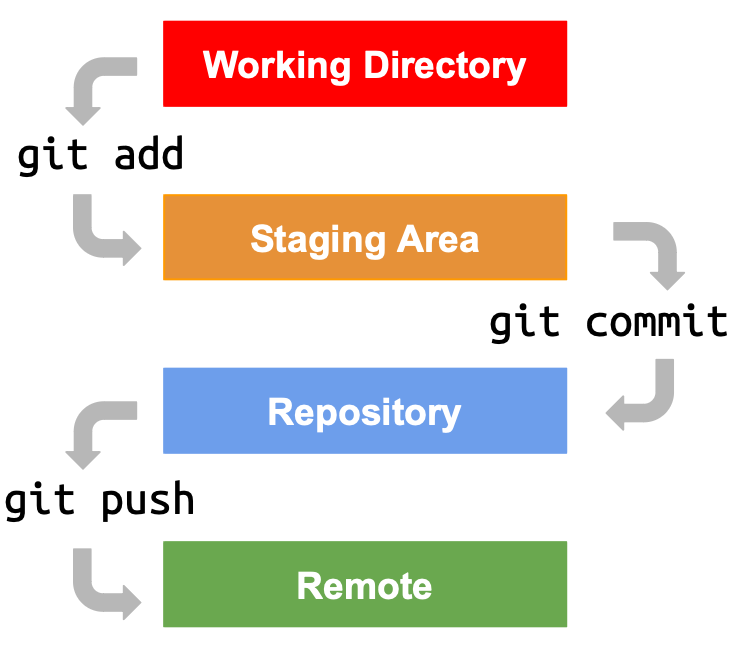
The typical Git workflow looks like the following:
Create, change, or delete a file in your working tree. This is the filesystem directory that contains your Git repository.
Stage (or add) the changes you want to include in your next commit. You use the git add <filename> command to stage files and directories.
Create a commit with the git commit -m <commit message> command. This stores a snapshot and hash in your .git directory.
You can (optionally) use git push to push that commit to a remote repository (like GitHub).
Git Workflow
Step 2: Make Your First Commit
Many people gain a theoretical knowledge of Git and then stop learning. Theory can only take you so far. Let's fix that.
Install Git
If you don't have Git installed, head over to the following documentation site for help:
https://git-scm.com/book/en/v2/Getting-Started-Installing-Git
You should be able to open a terminal or command prompt. Type git --version. The command should return your Git version.
Next, configure the username and email for your commits. You do this by typing the following:
git config --global user.name "Your Name"
git config --global user.email "[email protected]"
If you did this right, typing git config --list will show the variables you just set.
Initialize Your Repo
Next, create a directory somewhere on your filesystem. You can delete it later, so don't overthink this.
Change directories into your test directory and type git init.
This will initialize a Git repository in that directory, which is currently empty. There is a hidden directory, .git. It contains your repository metadata and snapshots.
Create and Commit a File
Now create a simple text file in your Git repository directory.
You can check the state of your repository with the git status command
$ git status
On branch main
No commits yet
Untracked files:
(use "git add <file>..." to include in what will be committed)
Git's return message indicates that you have an untracked file that you can add. Let's do that.
$ git add <file name>
Your file is now staged. If you run git status again, Git will tell you that the file is staged for the next commit.
$ git status
On branch main
No commits yet
Changes to be committed:
(use "git rm --cached <file>..." to unstage)
new file: test.txt
To commit the file, type:
git commit -m "first commit"
Finally, check out the (very short) commit history for your repository.
$ git log --oneline
dc963f3 (HEAD -> main) first commit
Congratulations, you created your first commit!
Step 3: Learn Branch Logic
Last, but not least, let's chat about branches, merges, and pull requests.
Branches are a way to separate your development work from the default (e.g. main or master) branch. It lets you do your work on a separate snapshot. You can later "merge" your changes into the default branch.
Here's what that looks like in practice. We will create a new branch in our git repository with the git branch command.
$ git branch test
Let's view the branch we just created using the git branch command.
$ git branch
* main
test
This created the branch named test. The git branch command shows we now have two branches: main and test. We are currently on the main branch (designated by the *).
Let's switch to the test branch with the git checkout command.
$ git checkout test
$ git branch
main
* test
Go ahead and make some changes to your test branch and commit them.
$ touch test2.txt
$ git add test2.txt
$ git commit -m "modify test branch"
Now, we want to merge our test branch with our default branch (main). We do that by switching back to the main branch and running the merge command.
$ git checkout main
Switched to branch 'main'
The syntax is git merge <name of branch you want to merge>
$ git merge test
Updating dc963f3..7ed2bdc
Fast-forward
test2.txt | 0
1 file changed, 0 insertions(+), 0 deletions (-)
create mode 100644 test2.txt
And that's it. The command merged all your changes from the test branch with the default branch. Congratulations!
finally:
There are many good reasons for learning Git. It will make you a better security engineer and it will help you communicate and collaborate better with product teams. Plus, it is a really interesting tool.
Here are a few resources to help you dive deeper:
Diving Deeper
Reference book: https://git-scm.com/docs
Pro Git book: https://git-scm.com/book/en/v2
Interactive Git branching tutorial: https://learngitbranching.js.org
Subscribe to the Newsletter
Join other product security champions getting deep dives delivered to their inbox for free every Tuesday.
Follow us: